21 Nov 2013

3 ways to speed up your android phone

You probably used to love your Android phone when it was new and you could zip through different apps with ease, but now you the lag between tapping something and your phone response has become unbearable. Your phone is not the only one that suffers from this malaise. Fear not, because in this article we take a look at some of the ways in which  you can speed up your Android phone.
android sick
In this article we provide 3 ways in which to speed up your android phone and get it back to normal / © AndroidPIT

Clear app cache

Ever since you got your phone, the apps on it have been writing into the app cache and this uses up your phone’s resources in the process which of course makes your phone slower. The way to fix this is to simply visit every app's property page within the settings on your phone and clear the cache on each and every app on your phone. The problem is that with a lot of apps on your phone, it can take a long time to do this so in order to speed up the process, you can install an app called app cache cleaner from the Google Play Store. This allows you to clear the cache on all the apps you have on your phone in one go, so you don’t have to spend a long time doing it manually.

Disable or uninstall the apps you don’t use

You can also disable and uninstall some of those apps that you don’t use as some may be eating up some system resources because they may be running in the background. Some apps that you probably want to target are those that came preloaded on your phone but you really don’t use all that much. If you have rooted your Android, you can get rid of these apps easily. If not, you can simply go to the app properties and disable the app to prevent it from running and using up your phone’s resources.

Remove widgets and shortcuts from the home screen

The widgets and shortcuts that you have on your home screen maybe aesthetically pleasing, but they also contribute to the slow response rate that you get from your phone, so unless you absolutely have to have the hottest YouTube videos on your home screen then just drag them of the screen. It also helps to remove all of the shortcuts from your home screen as well.
By implementing these three suggestions, you can significantly improve the speed of your Android handset. Do you have any other ways you know of that will improve the speed of a phone? If so, please leave us a comment below and we will get back to you.

17 Nov 2013

Android AsyncTask Example


Android how to work with AsyncTask  ?

Android AsyncTask work Threading in android.See this Android Painless Threading .

For Example ,i have AsyncTask which name is MyTask.

MyTask objMyTask = new MyTask();

Now to start AsyncTask call objMyTask.execute();

Rules::

  • The AsyncTask instance must be created in UI thread. 
  • .execute must be invoked on the UI thread.
  • Never call  objMyTask.onPreExecute(), objMyTask.doInBackground()objMyTask.onProgressUpdate() objMyTask.onPostExecute manually.
  • The AsyncTask can be executed only once (an exception will be thrown if a second execution is attempted.)

AsyncTask have Four Main Method...

  1. onPreExecute() 
  2. doInBackground()
  3. onProgressUpdate()
  4. onPostExecute() 

  • onPreExecute-This method is called first when you start AsyncTask using objAsync.execute().And mostly this method is use for initializing dialog(ProgressDialog,CustomDialog) and showing.
  • doInBackground-The main purpose of AsyncTask is accomplished by this method.Any non-UI thread process is running in this method.Such as Rss Feed Reader,Image and video Uploading and Downloading.You cant handle your View in this method.Because this method is non-UI thread.While any background process is running if you want to handle UI therea are  onProgressUpdate method. after completion of process this method send result to OnPostExecute.
  • onProgressUpdate-While backgrounding task is running ,you can handle your UI using this method .Such as status of downloading or uploading task.and this method is called from  doInBackground.Using publishProgress() you can call onProgressUpdate method to update UI while process is running.
  • onPostExecute -This method is called after the background computation finishes.The result of background process in passed in this method as parameters.And now you can dismiss progress dialog ,to indicate that background task is completed.


You can cancel AsyncTask using objAsyncTask.cancel().then you just check in doInBackground,

if (isCancelled()) {
break;
} else {
       //continue...
}


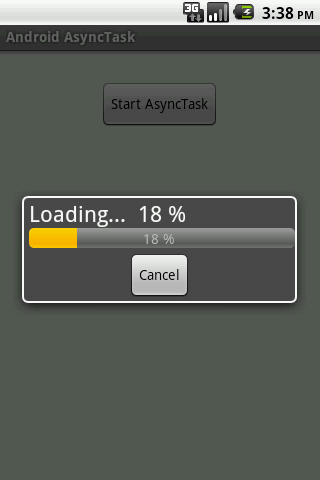
See this Image For more Clear.


15 Nov 2013

A simple example of Alarm Service, using AlarmManager


AlarmManager class provides access to the system alarm services. These allow you to schedule your application to be run at some point in the future. When an alarm goes off, the Intent that had been registered for it is broadcast by the system, automatically starting the target application if it is not already running.

In this exercise, a scheduled alarm of 10 seconds will start a service, MyAlarmService.


Modify main.xml to have two button to start and cancel the alarm.
<?xml version="1.0" encoding="utf-8"?>

<LinearLayout xmlns:android="http://schemas.android.com/apk/res/android"

android:orientation="vertical"

android:layout_width="fill_parent"

android:layout_height="fill_parent" >

<TextView

android:layout_width="fill_parent"

android:layout_height="wrap_content"

android:text="@string/hello" />

<Button

android:id="@+id/startalarm"

android:layout_width="fill_parent"

android:layout_height="wrap_content"

android:text="Start" />

<Button

android:id="@+id/cancelalarm"

android:layout_width="fill_parent"

android:layout_height="wrap_content"

android:text="Cancel" />

</LinearLayout>


AndroidAlarmService.java, the main activity.
package com.exercise.AndroidAlarmService;


import java.util.Calendar;


import android.app.Activity;

import android.app.AlarmManager;

import android.app.PendingIntent;

import android.content.Intent;

import android.os.Bundle;

import android.os.SystemClock;

import android.view.View;

import android.widget.Button;

import android.widget.Toast;


public class AndroidAlarmService extends Activity {


private PendingIntent pendingIntent;


/** Called when the activity is first created. */

@Override

public void onCreate(Bundle savedInstanceState) {

    super.onCreate(savedInstanceState);

    setContentView(R.layout.main);

    Button buttonStart = (Button)findViewById(R.id.startalarm);

    Button buttonCancel = (Button)findViewById(R.id.cancelalarm);

    buttonStart.setOnClickListener(new Button.OnClickListener(){


 @Override

 public void onClick(View arg0) {

  // TODO Auto-generated method stub


  Intent myIntent = new Intent(AndroidAlarmService.this, MyAlarmService.class);

  pendingIntent = PendingIntent.getService(AndroidAlarmService.this, 0, myIntent, 0);


           AlarmManager alarmManager = (AlarmManager)getSystemService(ALARM_SERVICE);


           Calendar calendar = Calendar.getInstance();

           calendar.setTimeInMillis(System.currentTimeMillis());

           calendar.add(Calendar.SECOND, 10);

           alarmManager.set(AlarmManager.RTC_WAKEUP, calendar.getTimeInMillis(), pendingIntent);


  Toast.makeText(AndroidAlarmService.this, "Start Alarm", Toast.LENGTH_LONG).show();

 }});


    buttonCancel.setOnClickListener(new Button.OnClickListener(){


 @Override

 public void onClick(View arg0) {

  // TODO Auto-generated method stub

  AlarmManager alarmManager = (AlarmManager)getSystemService(ALARM_SERVICE);

  alarmManager.cancel(pendingIntent);


           // Tell the user about what we did.

           Toast.makeText(AndroidAlarmService.this, "Cancel!", Toast.LENGTH_LONG).show();


 }});


}

}


MyAlarmService.java, it will be started in 10 seconds triggered by AlarmManager
package com.exercise.AndroidAlarmService;


import android.app.Service;

import android.content.Intent;

import android.os.IBinder;

import android.widget.Toast;


public class MyAlarmService extends Service {


@Override

public void onCreate() {

// TODO Auto-generated method stub

Toast.makeText(this, "MyAlarmService.onCreate()", Toast.LENGTH_LONG).show();

}


@Override

public IBinder onBind(Intent intent) {

// TODO Auto-generated method stub

Toast.makeText(this, "MyAlarmService.onBind()", Toast.LENGTH_LONG).show();

return null;

}


@Override

public void onDestroy() {

// TODO Auto-generated method stub

super.onDestroy();

Toast.makeText(this, "MyAlarmService.onDestroy()", Toast.LENGTH_LONG).show();

}


@Override

public void onStart(Intent intent, int startId) {

// TODO Auto-generated method stub

super.onStart(intent, startId);

Toast.makeText(this, "MyAlarmService.onStart()", Toast.LENGTH_LONG).show();

}


@Override

public boolean onUnbind(Intent intent) {

// TODO Auto-generated method stub

Toast.makeText(this, "MyAlarmService.onUnbind()", Toast.LENGTH_LONG).show();

return super.onUnbind(intent);

}


}


Finally, modify AndroidManifest.xml to have our MyAlarmService listed as service.
<?xml version="1.0" encoding="utf-8"?>

<manifest xmlns:android="http://schemas.android.com/apk/res/android"

  package="com.exercise.AndroidAlarmService"

  android:versionCode="1"

  android:versionName="1.0">

<application android:icon="@drawable/icon" android:label="@string/app_name">

    <activity android:name=".AndroidAlarmService"

              android:label="@string/app_name">

        <intent-filter>

            <action android:name="android.intent.action.MAIN" />

            <category android:name="android.intent.category.LAUNCHER" />

        </intent-filter>

    </activity>

<service android:name=".MyAlarmService" />

</application>

<uses-sdk android:minSdkVersion="4" />


</manifest>


download filesDownload the files

Voice Recording in Android

Put below code into your main Activity.

private static final String AUDIO_RECORDER_FILE_EXT_3GP = ".3gp";
private static final String AUDIO_RECORDER_FILE_EXT_MP4 = ".mp4";
private static final String AUDIO_RECORDER_FOLDER = "AudioRecorder";
private MediaRecorder recorder = null;
private int currentFormat = 0;
private int output_formats[] = { MediaRecorder.OutputFormat.MPEG_4, MediaRecorder.OutputFormat.THREE_GPP };
private String file_exts[] = { AUDIO_RECORDER_FILE_EXT_MP4, AUDIO_RECORDER_FILE_EXT_3GP };

@Override
public void onCreate(Bundle savedInstanceState) {
super.onCreate(savedInstanceState);
setContentView(R.layout.main);
setButtonHandlers();
enableButtons(false);
setFormatButtonCaption();
}

private void setButtonHandlers() {
    ((Button) findViewById(R.id.btnStart)).setOnClickListener(btnClick);
((Button) findViewById(R.id.btnStop)).setOnClickListener(btnClick);
((Button) findViewById(R.id.btnFormat)).setOnClickListener(btnClick);
}

private void enableButton(int id, boolean isEnable) {
((Button) findViewById(id)).setEnabled(isEnable);
}

private void enableButtons(boolean isRecording) {
enableButton(R.id.btnStart, !isRecording);
enableButton(R.id.btnFormat, !isRecording);
enableButton(R.id.btnStop, isRecording);
}

private void setFormatButtonCaption() {
((Button) findViewById(R.id.btnFormat)).setText(getString(R.string.audio_format) + " (" + file_exts[currentFormat] + ")");
}

private String getFilename() {
String filepath = Environment.getExternalStorageDirectory().getPath();
File file = new File(filepath, AUDIO_RECORDER_FOLDER);
if (!file.exists()) {
file.mkdirs();
}
return (file.getAbsolutePath() + "/" + System.currentTimeMillis() + file_exts[currentFormat]);
}

private void startRecording() {
recorder = new MediaRecorder();
recorder.setAudioSource(MediaRecorder.AudioSource.MIC);
recorder.setOutputFormat(output_formats[currentFormat]);
recorder.setAudioEncoder(MediaRecorder.AudioEncoder.AMR_NB);
recorder.setOutputFile(getFilename());
recorder.setOnErrorListener(errorListener);
recorder.setOnInfoListener(infoListener);
try {
recorder.prepare();
recorder.start();
} catch (IllegalStateException e) {
e.printStackTrace();
} catch (IOException e) {
e.printStackTrace();
}
}

private void stopRecording() {
  if (null != recorder) {
recorder.stop();
recorder.reset();
recorder.release();
recorder = null;
}
}

private void displayFormatDialog() {
AlertDialog.Builder builder = new AlertDialog.Builder(this);
String formats[] = { "MPEG 4", "3GPP" };
builder.setTitle(getString(R.string.choose_format_title)).setSingleChoiceItems(formats, currentFormat, new DialogInterface.OnClickListener() {
@Override
public void onClick(DialogInterface dialog, int which) {
currentFormat = which;
setFormatButtonCaption();
dialog.dismiss();
}
}).show();
}

private MediaRecorder.OnErrorListener errorListener = new MediaRecorder.OnErrorListener() {
  @Override
public void onError(MediaRecorder mr, int what, int extra) {
Toast.makeText(AudioRecordingActivity.this, "Error: " + what + ", " + extra, Toast.LENGTH_SHORT).show();
    }
};

private MediaRecorder.OnInfoListener infoListener = new MediaRecorder.OnInfoListener() {
@Override
public void onInfo(MediaRecorder mr, int what, int extra) {
Toast.makeText(AudioRecordingActivity.this, "Warning: " + what + ", " + extra, Toast.LENGTH_SHORT).show();
}
};

private View.OnClickListener btnClick = new View.OnClickListener() {
@Override
public void onClick(View v) {
        switch (v.getId()) {
          case R.id.btnStart: {
             Toast.makeText(AudioRecordingActivity.this, "Start Recording", Toast.LENGTH_SHORT).show();
                enableButtons(true);
             startRecording();
             break;
          }
          case R.id.btnStop: {
             Toast.makeText(AudioRecordingActivity.this, "Stop Recording", Toast.LENGTH_SHORT).show();
             enableButtons(false);
             stopRecording();
             break;
          }
          case R.id.btnFormat: {
             displayFormatDialog();
             break;
          }
       }
    }
};


Main.xml File:-


<?xml version="1.0" encoding="utf-8"?>
<LinearLayout xmlns:android="http://schemas.android.com/apk/res/android"
    android:orientation="vertical"
    android:layout_width="fill_parent"
    android:layout_height="fill_parent"
    android:padding="20dip">
  
    <ImageView
        android:layout_width="fill_parent"
        android:layout_height="wrap_content"
        android:src="@drawable/ic_launcher"
        android:scaleType="fitCenter"/>
  
        <TextView 
        android:layout_width="fill_parent"
        android:layout_height="wrap_content"
        android:text="@string/app_info"
        android:layout_weight="1.0"
        android:textSize="20dip"/>
      
    <LinearLayout
        android:orientation="horizontal"
        android:layout_width="fill_parent"
        android:layout_height="wrap_content">
      
        <Button
                android:layout_width="wrap_content"
                android:layout_height="wrap_content"
                android:id="@+id/btnStart"
                android:text="@string/start_recording"
                android:layout_weight="1.0"/>
              
                <Button
                android:layout_width="wrap_content"
                android:layout_height="wrap_content"
                android:id="@+id/btnStop"
                android:text="@string/stop_recording"
                android:layout_weight="1.0"/>
              
        <Button
                android:layout_width="wrap_content"
                android:layout_height="wrap_content"
                android:id="@+id/btnFormat"
                android:text="Format (mp4)"
                android:layout_weight="1.0"/>
      
    </LinearLayout>
</LinearLayout>


Add Below Permissions to manifest.xml file.

<uses-permission android:name="android.permission.RECORD_AUDIO"/>
<uses-permission android:name="android.permission.WRITE_EXTERNAL_STORAGE"/>

Download Full Source Code from below link.

Voice Recording in Android

Don’t forget to provide feedback or follow this blog, if you find this blog is useful.